万字长文入门Vert.x
潜龙勿用
什么是Vert.x
Eclipse Vert.x是Eclipse基金会下面的一个开源项目,Vert.x的基本定位是一个事件驱动的编程框架,通过Vert.x使用者可以用相对低的成本就享受到NIO带来的高性能。Vert.x对异步处理和事件驱动做了一些合理抽象,第三方可以基于这些抽象提供扩展组件,目前市面上也已经有很多这一类组件了。

关于BIO和NIO
BIO和NIO是老生常谈的话题,一般谈起IO,主要分为三种:BIO、NIO和AIO。在Linux上主要是前两种比较多,AIO目前支持还不够完善。关于这三种IO细节上的区别如下:
1.BIO (同步阻塞I/O模式)
数据的读取写入必须阻塞在一个线程内等待其完成。
这里使用那个经典的烧开水例子,这里假设一个烧开水的场景,有一排水壶在烧开水,BIO的工作模式就是, 叫一个线程停留在一个水壶那,直到这个水壶烧开,才去处理下一个水壶。但是实际上线程在等待水壶烧开的时间段什么都没有做。
2.NIO(同步非阻塞)
同时支持阻塞与非阻塞模式,但这里我们以其同步非阻塞I/O模式来说明,那么什么叫做同步非阻塞?如果还拿烧开水来说,NIO的做法是叫一个线程不断的轮询每个水壶的状态,看看是否有水壶的状态发生了改变,从而进行下一步的操作。
3.AIO (异步非阻塞I/O模型)
异步非阻塞与同步非阻塞的区别在哪里?异步非阻塞无需一个线程去轮询所有IO操作的状态改变,在相应的状态改变后,系统会通知对应的线程来处理。对应到烧开水中就是,为每个水壶上面装了一个开关,水烧开之后,水壶会自动通知我水烧开了。
在Java语言中,这三种IO都是支持的,其中AIO被称作NIO2,是JDK1.7引入的,不过就实际使用来说,还是前两种用得比较广泛。大名鼎鼎的网络框架netty,就是基于NIO的,不过netty的NIO模型不是基于JDK的,而是自己实现了一套,但本质上来说,都是IO多路复用。这里要澄清一些概念上的东西,很容易发生混淆:
- NIO就是异步IO吗?
不对,BIO的全称是同步阻塞IO,NIO是同步非阻塞IO,AIO才是异步非阻塞IO。所以关键点在是否阻塞,就目前的技术来说,真正异步的IO应用还不广泛。
- select、poll、epoll和NIO之间的关系
实际上更多的关注的是select、poll和epoll之间的区别,三者其实都是NIO的实现手段。通常聊到NIO会联系到epoll,但两者并不等价。,关于select、poll、epoll的原理可参考下面文档:
NIO相比于BIO,具有更好的并发能力,相同的服务器在同一时间能能够处理更多的请求,更节省资源,不过相应的会带来开发成本的提升,所以通常情况下,只有底层框架或者性能敏感的场景才会考虑使用NIO。
Vert.x 和 Netty 之间的关系
Netty 是 Vert.x 底层是用的通讯组件,Vert.x 为了最大限度的降低使用门槛,刻意屏蔽掉了许多底层 Netty 相关的细节,比如ByteBuf、引用计数等等。不过如果你细心的话,实际上还是能找到很多netty的影子。
熟悉netty的同学应该知道,在netty中有两个EventLoop,一个BossEventLoop和一个WorkerEventLoop,分别负责负责监听Socket事件和处理对应的请求。在Vert.x中,这两个EventLoop通过一定的方法都可以获取到。不过,通常来说更加关注的是WorkerEventLoop,因为用户自定义的代码跑在这个EventLoop上。Vert.x对这个EventLoop作了扩展,除了处理服务器IO事件以外,用户自定义的事件也可以基于Vert.x进行处理。

见龙在田
使用Vert.x构建一个简单的HttpServer,只需要几行代码:
 1<dependency>
 2    <groupId>io.vertx</groupId>
 3    <artifactId>vertx-web</artifactId>
 4    <version>${vertx.version}</version>
 5  </dependency>
 6
 7<dependency>
 8    <groupId>io.vertx</groupId>
 9    <artifactId>vertx-unit</artifactId>
10    <version>${vertx.version}</version>
11    <scope>test</scope>
12</dependency>
 1HttpServer server = vertx.createHttpServer();
 2
 3server.requestHandler(request -> {
 4
 5  // This handler gets called for each request that arrives on the server
 6  HttpServerResponse response = request.response();
 7  response.putHeader("content-type", "text/plain");
 8
 9  // Write to the response and end it
10  response.end("Hello World!");
11});
12
13server.listen(8080);
不过一个完整的HttpServer还需要能够处理HTTP协议层面的东西,对于这些,Vert.x都做了封装,比如请求路由,在Vert.x中可以通过Router来完成:
 1Router router = Router.router(vertx);
 2router
 3        .get("/api/health-check")
 4        .handler(
 5            context ->
 6                context
 7                    .response()
 8                    .setStatusCode(200)
 9                    .putHeader("content-type", "application/json;charset=utf-8")
10                    .putHeader("cache-control", "no-cache")
11                    .end(
12                        new JsonObject()
13                            .put("code", 0)
14                            .put("time", System.currentTimeMillis())
15                            .toBuffer()));
如果你想了解更多的细节,可以参考下面的文档:https://vertx.io/docs/vertx-web/java/
一个Vert.x的应用程序可以直接以jar包的形式进行发布,由于Vert.x本身的依赖非常轻(除了netty以外没有任何依赖),所以使用Vert.x发布的应用程序也可以做到很小(十几M),相比于Spring动辄几百M的jar,具有明显的优势。

下面是针对Vert.x和Spring的一个性能测试,可以看到在个方面,Vert.x相比于Spring都有明显的性能优势(数据来源:https://www.techempower.com/benchmarks/#section=data-r19&hw=ph&test=composite)
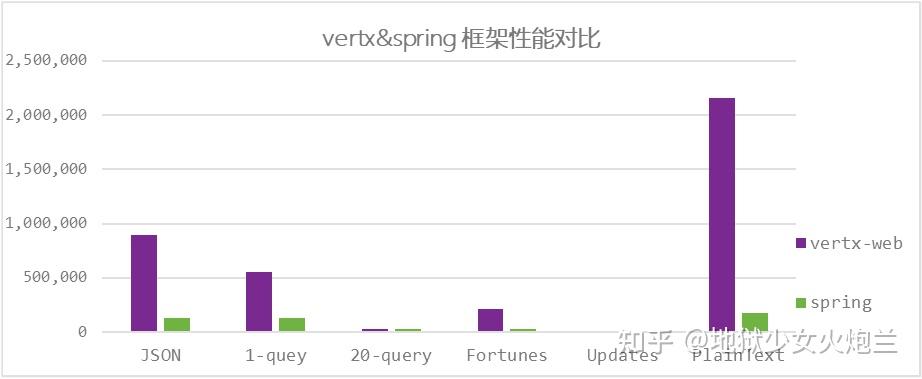
总结一下:如果你的服务业务逻辑不太复杂并且非常关注性能,那么Vert.x会是一个非常好的选择。
飞龙在天
关于Vert.x的基本介绍就到这里了,接下来介绍一些在实际使用中的经验。
黄金法则
在Vert.x中有一个黄金法则,那就是永远不要阻塞EventLoop!阻塞的代码会导致EventLoop无法正常响应其它事件,由此可能引发性能问题甚至服务不可用,这种情况是应该极力避免的。
那么哪些代码可以称为阻塞代码呢?官方文档上有一个说明:
- Thead.sleep()
- 等待一个锁
- 等待一个互斥信号或监视器(例如同步的代码块)
- 执行一个长时间数据库操作并等待其结果
- 执行一个复杂的计算,占用了可感知的时长
- 在循环语句中长时间逗留
上面的这些情况都可以称之为阻塞,更加概括的说,IO操作或者占用了可感知时间(微秒级别以上)的CPU密集型操作都可以称之为阻塞,这些代码一定不能在EventLoop上执行。但是,阻塞的情况是客观存在的,如果实际问题中必须执行阻塞代码,这种情况怎么做呢?
在Vert.x中提供了一种执行阻塞的代码的方法executeBloking,Vert.x的Context上关联了一个固定大小的线程池(关于Context,我会在接下来的部分讲到),这个线程池的大小默认是20,当然是可以配置的,阻塞的任务放到这个这里面去执行就不会阻塞事件循环了。下面是一个例子:
1vertx.executeBlocking(promise -> {
2  // Call some blocking API that takes a significant amount of time to return
3  String result = someAPI.blockingMethod("hello");
4  promise.complete(result);
5}, res -> {
6  System.out.println("The result is: " + res.result());
7});
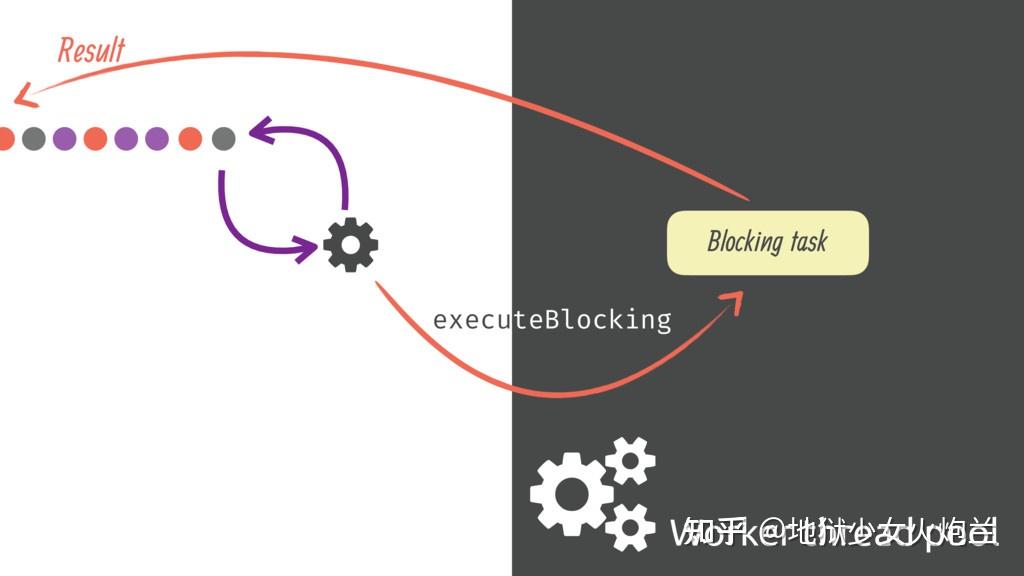
executeBlocking是在Vert.x环境中解决阻塞代码问题的一种方法,但并不是银弹。实际上Vert.x也并不提倡用这种方式来实现业务逻辑,为什么呢?因为这种方式会带来一次线程的上下文切换从而造成性能损失。Java语言由于现阶段不支持协程,在处理这种IO场景的时候会遇到很多问题。具体来说,某一个线程在遇到阻塞的操作的时候,没有办法挂起当前执行栈并让当前线程先执行别的任务从而充分利用CPU;而如果采用多线程+Future的方式,两个线程在交接的过程中会发生线程上下文切换,而这个开销往往是非常高的,在大并发的情况下也会成为瓶颈。Vert.x为了解决这个问题,将原本连续的代码人为设计为一段一段的,同时这些代码始终跑在同一个线程上,通过这种方式来模拟协程的运行原理。所以,即便是executeBlocking能够解决问题,但也仅限于没有别的选择的情况下。
实际上,Vert.x提供了非常多的原生组件来达到异步的效果,比如vertx-redis-client,vertx-kafka-client,vertx-mysql-client等,这些组件并不是简单地基于原本的第三方jar包+executeBlocking包装实现,而是直接从TCP层面实现了原本的协议,同时带来了真正的异步。
关于Context
查看executeBlocking方法的接口文档,可以看到下面的定义:
 1 /**
 2   * Safely execute some blocking code.
 3   * <p>
 4   * Executes the blocking code in the handler {@code blockingCodeHandler} using a thread from the worker pool.
 5   * <p>
 6   * When the code is complete the handler {@code resultHandler} will be called with the result on the original context
 7   * (e.g. on the original event loop of the caller).
 8   * <p>
 9   * A {@code Future} instance is passed into {@code blockingCodeHandler}. When the blocking code successfully completes,
10   * the handler should call the {@link Promise#complete} or {@link Promise#complete(Object)} method, or the {@link Promise#fail}
11   * method if it failed.
12   * <p>
13   * In the {@code blockingCodeHandler} the current context remains the original context and therefore any task
14   * scheduled in the {@code blockingCodeHandler} will be executed on the this context and not on the worker thread.
15   * <p>
16   * The blocking code should block for a reasonable amount of time (i.e no more than a few seconds). Long blocking operations
17   * or polling operations (i.e a thread that spin in a loop polling events in a blocking fashion) are precluded.
18   * <p>
19   * When the blocking operation lasts more than the 10 seconds, a message will be printed on the console by the
20   * blocked thread checker.
21   * <p>
22   * Long blocking operations should use a dedicated thread managed by the application, which can interact with
23   * verticles using the event-bus or {@link Context#runOnContext(Handler)}
24   *
25   * @param blockingCodeHandler  handler representing the blocking code to run
26   * @param resultHandler  handler that will be called when the blocking code is complete
27   * @param ordered  if true then if executeBlocking is called several times on the same context, the executions
28   *                 for that context will be executed serially, not in parallel. if false then they will be no ordering
29   *                 guarantees
30   * @param <T> the type of the result
31   */
32  <T> void executeBlocking(Handler<Promise<T>> blockingCodeHandler, boolean ordered, Handler<AsyncResult<@Nullable T>> resultHandler);
可以看到这样的说明:In the {@code blockingCodeHandler} the current context remains the original context and therefore any task , scheduled in the {@code blockingCodeHandler} will be executed on the this context and not on the worker thread.
这里面的Context到底是什么含义? 同时我们还注意到一个参数ordered,这个又是什么意思?
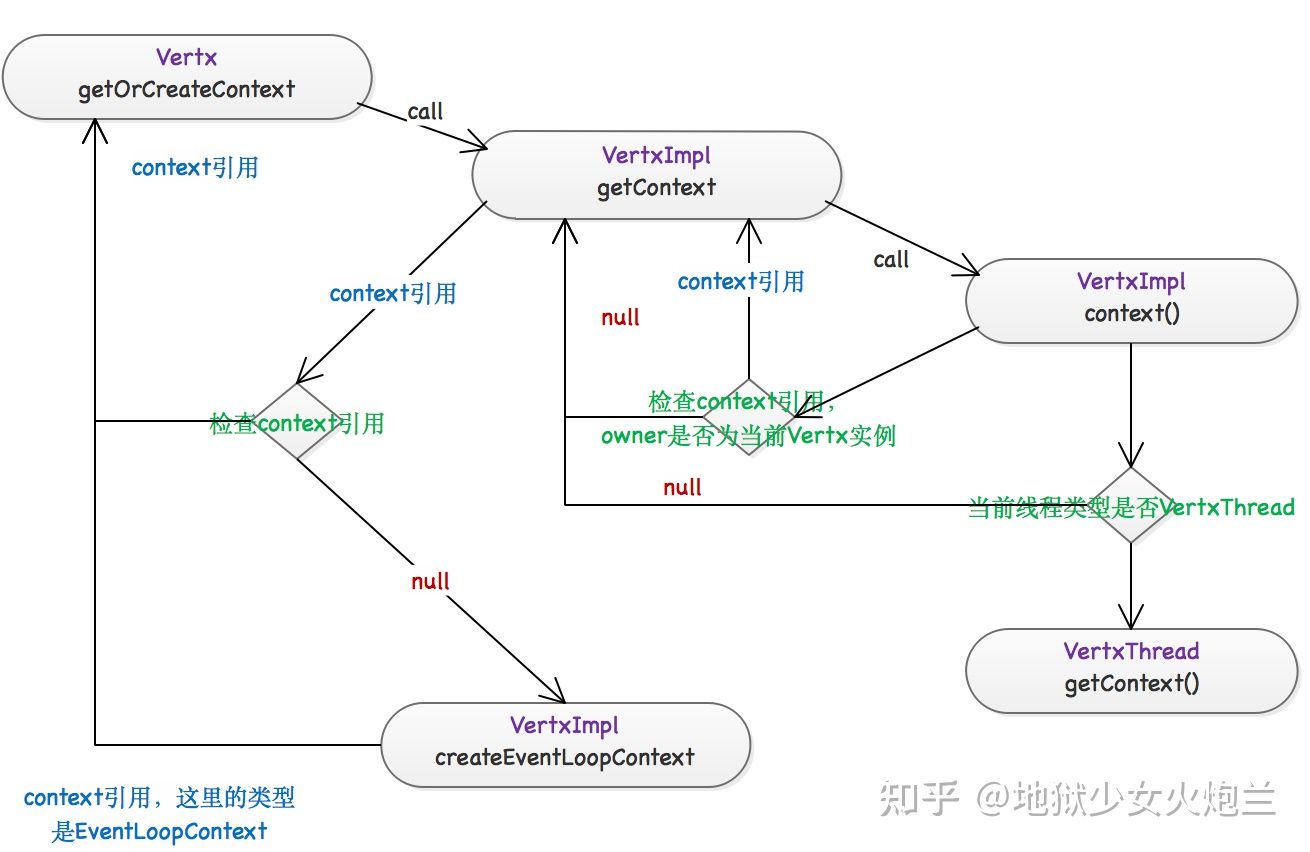
点开VertImpl这个类的源码,我们会发现executeBlocking这个方法实际上是委托给Context去做的:
1  public <T> void executeBlocking(Handler<Promise<T>> blockingCodeHandler, boolean ordered,
2                                  Handler<AsyncResult<T>> asyncResultHandler) {
3    ContextInternal context = getOrCreateContext();
4    context.executeBlocking(blockingCodeHandler, ordered, asyncResultHandler);
5  }
在执行阻塞代码之前会获取Context,这个Context是如何获得的呢?
 1public ContextInternal getOrCreateContext() {
 2    ContextInternal ctx = getContext();
 3    if (ctx == null) {
 4      // We are running embedded - Create a context
 5      ctx = createEventLoopContext(null, null, null, Thread.currentThread().getContextClassLoader());
 6    }
 7    return ctx;
 8  }
 9
10 public AbstractContext getContext() {
11    AbstractContext context = (AbstractContext) ContextInternal.current();
12    if (context != null && context.owner() == this) {
13      return context;
14    }
15    return null;
16  }
17
18static ContextInternal current() {
19    Thread current = Thread.currentThread();
20    if (current instanceof VertxThread) {
21      return ((VertxThread) current).context();
22    } else if (current instanceof FastThreadLocalThread) {
23      return AbstractContext.holderLocal.get().ctx;
24    }
25    return null;
26  }
先从当前线程获取,如果获取不到,就创建一个。中间涉及到一类特殊的线程,称为VertxThread,一个VertxThread的定义如下:
 1public final class VertxThread extends FastThreadLocalThread implements BlockedThreadChecker.Task {
 2
 3  static final String DISABLE_TCCL_PROP_NAME = "vertx.disableTCCL";
 4  static final boolean DISABLE_TCCL = Boolean.getBoolean(DISABLE_TCCL_PROP_NAME);
 5
 6  private final boolean worker;
 7  private final long maxExecTime;
 8  private final TimeUnit maxExecTimeUnit;
 9  private long execStart;
10  private ContextInternal context;
11
12  public VertxThread(Runnable target, String name, boolean worker, long maxExecTime, TimeUnit maxExecTimeUnit) {
13    super(target, name);
14    this.worker = worker;
15    this.maxExecTime = maxExecTime;
16    this.maxExecTimeUnit = maxExecTimeUnit;
17  }
18
19  /**
20   * @return the current context of this thread, this method must be called from the current thread
21   */
22  ContextInternal context() {
23    return context;
24  }
25
26  private void executeStart() {
27    if (context == null) {
28      execStart = System.nanoTime();
29    }
30  }
31
32  private void executeEnd() {
33    if (context == null) {
34      execStart = 0;
35    }
36  }
37
38  public long startTime() {
39    return execStart;
40  }
41
42  public boolean isWorker() {
43    return worker;
44  }
45
46  @Override
47  public long maxExecTime() {
48    return maxExecTime;
49  }
50
51  @Override
52  public TimeUnit maxExecTimeUnit() {
53    return maxExecTimeUnit;
54  }
55
56  /**
57   * Begin the emission of a context event.
58   * <p>
59   * This is a low level interface that should not be used, instead {@link ContextInternal#emit(Object, io.vertx.core.Handler)}
60   * shall be used.
61   *
62   * @param context the context on which the event is emitted on
63   * @return the current context that shall be restored
64   */
65  ContextInternal beginEmission(ContextInternal context) {
66    if (!ContextImpl.DISABLE_TIMINGS) {
67      executeStart();
68    }
69    ContextInternal prev = this.context;
70    this.context = context;
71    return prev;
72  }
73
74  /**
75   * End the emission of a context task.
76   * <p>
77   * This is a low level interface that should not be used, instead {@link ContextInternal#emit(Object, io.vertx.core.Handler)}
78   * shall be used.
79   *
80   * @param prev the previous context thread to restore, might be {@code null}
81   */
82  void endEmission(ContextInternal prev) {
83    // We don't unset the context after execution - this is done later when the context is closed via
84    // VertxThreadFactory
85    context = prev;
86    if (!ContextImpl.DISABLE_TIMINGS) {
87      executeEnd();
88    }
89  }
90}
每个VertxThread都持有一个ContextInternal的引用,同时这个引用是可以被修改的;而每个ContextInternal又会和一个EventLoop相关联,这时候再来看看executeBlocking方法:
 1static <T> Future<T> executeBlocking(ContextInternal context, Handler<Promise<T>> blockingCodeHandler,
 2      WorkerPool workerPool, TaskQueue queue) {
 3    PoolMetrics metrics = workerPool.metrics();
 4    Object queueMetric = metrics != null ? metrics.submitted() : null;
 5    Promise<T> promise = context.promise();
 6    Future<T> fut = promise.future();
 7    try {
 8      Runnable command = () -> {
 9        Object execMetric = null;
10        if (metrics != null) {
11          execMetric = metrics.begin(queueMetric);
12        }
13        context.emit(promise, f -> {
14          try {
15            blockingCodeHandler.handle(promise);
16          } catch (Throwable e) {
17            promise.tryFail(e);
18          }
19        });
20        if (metrics != null) {
21          metrics.end(execMetric, fut.succeeded());
22        }
23      };
24      Executor exec = workerPool.executor();
25      if (queue != null) {
26        queue.execute(command, exec);
27      } else {
28        exec.execute(command);
29      }
30    } catch (RejectedExecutionException e) {
31      // Pool is already shut down
32      if (metrics != null) {
33        metrics.rejected(queueMetric);
34      }
35      throw e;
36    }
37    return fut;
38  }
注意Context.emit()方法,这个方法实际上就是将VertxThread上的Context引用赋值成自己!阻塞任务在完成后,会调用注册的回调,而回调会执行在当前Context关联的EventLoop上,这也就是实现了 EventLoop提交任务->在WorkerPool中执行任务->任务完成后在EventLoop上执行回调。可以看到,Context实际上起到的作用是将一系列执行线路上的操作串联起来,同时将阻塞和非阻塞的操作分开。
关于Context的原理也可以参考下面这些文章:
https://silentbalanceyh.gitbooks.io/vert-x/content/chapter01/01-6-context-environment.htmlsilentbalanceyh.gitbooks.ioAn Introduction to the Vert.x Context Objectvertx.io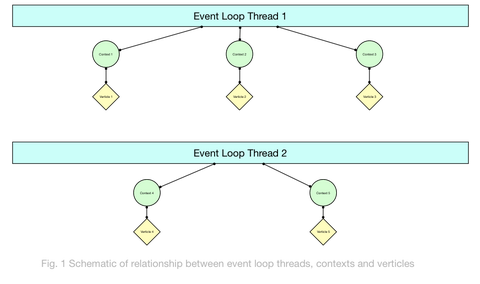

再回到ordered这个参数的问题,如果设置成true,任务会被放入一个FIFO的链表中,确保任务是按提交顺序执行的,否则就和我们使用线程池没差别了,直接提交到线程池中执行。注意,如果不要求有序的话,这个参数应该设置成false,这样能带来更好的性能。
与第三方框架集成
由于Vert.x独特的线程管理机制,我们在Vert.x中使用第三方框架的时候,涉及到线程池的使用一定要合理利用Context,来避免不必要的线程上下文切换,这里举两个例子:
Caffeine
Caffeine是一个高性能的的内存缓存框架,在构造Caffeine实例的过程中,需要传入一个Executor对象来执行一些调度任务,这个Executor应该通过Context进行模拟,避免使用额外的线程池:
 1public final class VertxContextExecutor implements Executor {
 2
 3  private final Vertx vertx;
 4
 5  public VertxContextExecutor(@NonNull Vertx vertx) {
 6    this.vertx = vertx;
 7  }
 8
 9  @Override
10  public void execute(@NonNull Runnable command) {
11    vertx.runOnContext(v -> command.run());
12  }
13}
以下是一个缓存构造示例:
 1Caffeine.newBuilder()
 2            .maximumSize(200)
 3            .executor(new VertxContextExecutor(vertx))
 4            .refreshAfterWrite(Duration.ofMinutes(2))
 5            .buildAsync(
 6                new AsyncCacheLoader<>() {
 7                  @Override
 8                  public @NonNull CompletableFuture<Optional<HashFunction>> asyncLoad(
 9                      @NonNull AuthEntry key, @NonNull Executor executor) {
10                    return vertx
11                        .executeBlocking(
12                            (Promise<Optional<HashFunction>> promise) ->
13                                loadHashFunction(key.getAppId(), promise),
14                            false)
15                        .toCompletionStage()
16                        .toCompletableFuture();
17                  }
18                });
这篇文章中也有类似的示例:
地狱少女火炮兰:如何在Vert.x中使用CompletableFuturezhuanlan.zhihu.com
Failsafe
Failsafe是一个重试框架,在Vert.x中使用Failsafe同样有一些小技巧。Failsafe中有一个Scheduler接口负责调度重试任务,需要通过包装Context来实现:
 1import com.google.common.base.Preconditions;
 2import io.vertx.core.Vertx;
 3import lombok.NonNull;
 4import lombok.extern.slf4j.Slf4j;
 5import net.jodah.failsafe.util.concurrent.DefaultScheduledFuture;
 6import net.jodah.failsafe.util.concurrent.Scheduler;
 7
 8import java.util.concurrent.Callable;
 9import java.util.concurrent.ScheduledFuture;
10import java.util.concurrent.TimeUnit;
11
12/**
13 * @author fishzhao
14 * @since 2021-01-07
15 */
16@Slf4j
17public final class FailsafeVertxScheduler implements Scheduler {
18
19  private final Vertx vertx;
20
21  public FailsafeVertxScheduler(@NonNull Vertx vertx) {
22    this.vertx = vertx;
23  }
24
25  private static void execute(Callable<?> callable) {
26    try {
27      callable.call();
28    } catch (Exception e) {
29      log.error("Failsafe threw exception: ", e);
30    }
31  }
32
33  @Override
34  public ScheduledFuture<?> schedule(Callable<?> callable, long l, TimeUnit timeUnit) {
35    Preconditions.checkArgument(l >= 0, "illegal delay: %s", l);
36    if (l == 0) {
37      vertx.runOnContext(v -> execute(callable));
38      return new VertxScheduledFuture<>(null, -1);
39    }
40    long timerId = vertx.setTimer(timeUnit.toMillis(l), id -> execute(callable));
41    return new VertxScheduledFuture<>(vertx, timerId);
42  }
43
44  private static final class VertxScheduledFuture<T> extends DefaultScheduledFuture<T> {
45    private final Vertx vertx;
46    private final long timerId;
47
48    public VertxScheduledFuture(Vertx vertx, long timerId) {
49      this.vertx = vertx;
50      this.timerId = timerId;
51    }
52
53    @Override
54    public boolean cancel(boolean mayInterruptIfRunning) {
55      if (timerId >= 0 && vertx != null) {
56        return vertx.cancelTimer(timerId);
57      }
58      return false;
59    }
60  }
61}
下面是一个使用示例:
1private Future<SendResult> sendBytesRetry(String tid, List<byte[]> bytes) {
2    // Benchmark                 Mode  Cnt    Score    Error  Units
3    // UUIDPerformanceTest.uuid  avgt   25  684.833 ± 22.660  ns/op
4    String uuid = UUID.randomUUID().toString();
5    CompletableFuture<SendResult> completableFuture =
6        Failsafe.with(retryPolicy).with(scheduler).getStageAsync(() -> sendBytes(tid, uuid, bytes));
7    return Future.fromCompletionStage(completableFuture);
8  }
在Vert.x使用native-transport
由于Vert.x底层是基于netty的,因此我们可以享受到很多netty的高级特性。比如netty的native支持来获取更高的性能。
要开启netty的native-transport,需要先引入如下依赖:
1        <dependency>
2            <groupId>io.netty</groupId>
3            <artifactId>netty-transport-native-epoll</artifactId>
4            <version>${netty.version}</version>
5            <classifier>linux-x86_64</classifier>
6        </dependency>
netty的版本一定要和Vert.x引用的版本一致,否则可能引发未知问题。除此之外,在使用Vert.x的时候还需要一些额外的配置:
1Vertx vertx = Vertx.vertx(new VertxOptions().setPreferNativeTransport(true));
2vertx.createHttpServer(
3            new HttpServerOptions().setTcpNoDelay(true).setTcpFastOpen(true).setTcpQuickAck(true));
关于Vert.x的一些介绍到这里就基本结束了,主要还是靠实践;个人水平有限,难免有所纰漏,还希望大家谅解,有任何问题,欢迎留言讨论。